Friday 16 December 2011

Christmas Bulbs


The kids and I decorated Christmas bulbs!

I bought a package of 6 ready to paint glass bulbs at a craft store in Vaughn Mall.  I think they may have been primed because they had a cream matte finish.  So I bought red, white and gold acrylic paint and we went to town.


To start I swirled some gold metallic paint around the bulb with my hands to give the bulb a nice background tone.


Oliver's were easy!  And he loved it... he loves anything to do with getting his hands dirty.  The easiest way I could get most of his hand print on the bulb without smudging was if I let him hold the buld in his palms with both hands.  We practised a few times and then he helped me paint his fingers and palms.  I told him to open his hands then I rested the buld in his hands and let him hold it for a few seconds.  I told him to let go and then I set them out to dry.


Opal's on the other hand... were a very different story.  Foot prints for young ins are not easy as it is... try it on a bulb and it just gets harder... try a hand print on a bulb!  It can't be done!  So we did her foot print.  But not without a few failed attempts.  Once with red paint which I swirled around with my hands to blend in and once with white paint.  Finally Hubby had to step in and we pulled it off!

Once they were dry I used permanent marker to write the year and their names on and tied some bronze coloured ribbon in a bow at the top.  We made 6 bulbs, I kept a set for myself and we gave my parents (Nana & Papa) and Hubby's parents (Grandma & Grandpa) a set for Christmas.


They All Loved Them!

Be inspired...

Get Creative!

Saturday 10 December 2011

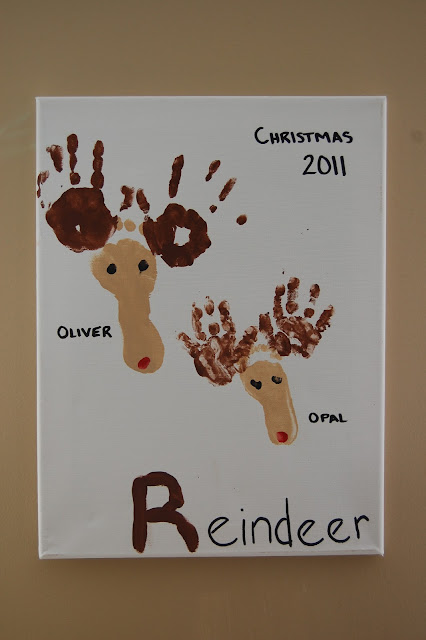
Reindeer Foot and Hand Prints

The kids and I were busy today creating!  My Hubby brought home a giant roll of brown paper the other day for our Christmas gifts.  I thought it would be cute to decorate the paper with Christmas themed hand and feet prints of the kids.  So to practise we made reindeer faces with their hands and feet and ended up with a keepsake on canvas.


What we used:
13`` by 21`` white canvas
beige acrylic paint
brown acrylic paint
black acrylic paint
red acrylic paint
paper plates
permanent marker

Their feet are the faces and their hands made the antlers.  Then we used their thumbs to make the eyes and nose.  Using only THEIR hand, foot and thumbs for THEIR individual reindeer ensured that the reindeer features looked proportioned.  Then I just wrote with permanent marker the year and their names beside each face.  Simple right! 

I soon realised that hand prints with young kiddies can be tricky.  I wasn't intentionally planning on writing Reindeer at the bottom but my son got carried away with his finger painting and we ended up with a blob of beige paint at the bottom of the canvas.  So I made it into a large R and wrote eindeer beside it and I think it looks really cute! 

Now we have a super adorable painting keepsake that I can bring out every year and show off too our family and friends! 

I hope you enjoyed this quick post...

Be inspired...
Get Creative!


Friday 25 November 2011

Christmas Photo Shoot

I'm always looking for different ideas for Christmas cards. 
I saw some pictures on Pinterest with kids playing with Christmas lights so I thought I would try it out with the kiddies!


Opal as you can see loved the lights and would have sat there for hours


... and hours


Oliver eventually joined in


We eventually moved to the floor because it created a great reflection effect that came across even better then I pictured it would. 
The above picture is the one we ended up using for our card this year. 
I went to Zehrs and printed 4x6's,
I used their kiosk to add Happy Holidays at the bottom left hand side in white script. 
I then bought 4x6 envelopes at Staples and
made awesome photo Christmas cards for under 50 cents each!

And everyone loved them... I heard for weeks after we sent them out how cute they were!

And those are our 2011 Christmas Cards!

Be Inspired...

Get Creative!

Monday 25 July 2011

Disney Cars Party

My two year old is crazy for Cars so a Cars crazy party is what he got!  I had lots of fun with this... luckily the Cars 2 movie was coming out in theatres in August so there was Cars stuff everywhere in stores.  I got most of my supplies from Dollarama.

First I made the invitations.  I used red folding cards from Dollarama (these are great, they are available in all sorts of colours and come in a pack of 6 for $2!).  I searched all over for a Lighting McQueen stamp but all I could find was a "Ready Set Go" which suited pretty good.  And of course a few weeks later I found the exact stamp I was looking for at Dollarama of all places, but the need for it was long gone.  So I found some pictures on the Internet and printed a bunch of McQueen's and Mater's out on photo paper.  I used some gold metallic rectangles to set it off a bit and then embossed the "Ready Set Go" stamp in glossy black.  For the inside I stamped "Your invited" and printed the party info also on photo paper with another picture of McQueen racing as a watermark.


I didn't go too crazy on the decorating and focused more on things for the kids to do.  I put up red and yellow balloons and just used plain yellow and red plates, silverware, napkins and table cloths.  I got Cars tattoos, Frisbees and beach balls and let the kids go wild.

Oliver showing off some of his funky tattoos!

My dad rented a red "sports" car and offered rides around the block.  Well it wasn't really a sports car but it was red so Oliver couldn't tell.


Oliver pretending to take McQueen for a spin.

I also planned some activities that the kids could do inside in case it was too hot outside and they needed to cool down.  I found these great cardboard canvas pictures with McQueen printed on them.  Instead of goodie bags I got Cars themed paper bags and filled them with Cars stickers, stamps, crayons and markers for each of the kids.  All of which I also found at Dollarama and the kids loved using them all over their Cars pictures.


Oliver colouring his Cars picture.

I also baked some plain sugar cookies in a bunch of car and truck shapes and put out some maple syrup cream cheese icing and a bunch of sprinkles and candies.  The kids had a awesome time decorating their cookies and couldn't get enough!  It was messy but fun and super cute watching the kids put a few sprinkles on their cookie and then a few in their mouth.

Oliver decorating his car shaped sugar cookie.

I made my signature birthday cake with rice flour and maple syrup.  Oliver just loves it and its not packed full of sugar like store bought cake so I feel better about him eating three pieces.  The icing I also made with maple syrup whipped with cream cheese.  Click on the lower right picture for the recipes.  I used green sugar on the top and let it run in order to look like grass and created a road with chocolate cookie crumbs that went across the plate, up the cake and down again.  Yellow gummy bears made the road lines and I used a tiny McQueen from a Kinder Egg and reflective stickers on toothpicks of the other movie characters.

McQueen and Mater Cake Balls
Cars Cake

The cake balls were my favourite part about this party.  I made them chocolate cream flavor with chocolate cake and vanilla icing.  Click the above left picture for the recipe.  I coated half with red chocolate and half with milk chocolate.  I used yellow chocolate on the red ones and wrote "95" on them to signify McQueen and used shaved almonds for Mater's two buck teeth.  I love how the Mater's turned out!  They were almost to cute to eat!

Oliver really taking McQueen for a spin!

All in all the party was a huge success by Oliver.  It was tons of fun and a great memory with the family.  He suitingly got a McQueen car as one of his presents and scooted around the backyard for the rest of the afternoon.  He absolutely loved the entire day!

Be Inspired...

Get Creative!